 English
- All
- Product Name
- Product Keyword
- Product Model
- Product Summary
- Product Description
- Multi Field Search
EnglishViews: 0 Author: Site Editor Publish Time: 2026-06-23 Origin: Site


A failed laundry appliance halts household and commercial operations entirely. Mountains of dirty clothes build up quickly when a drum refuses to spin. However, true drive failures are frequently misdiagnosed by frustrated owners. "Repairing" a modern drive unit usually means replacing the entire motor assembly, swapping out a blown start capacitor, or installing a new drive belt. Technicians rarely rebuild internal copper coils today. This guide provides an evidence-based diagnostic path to help you isolate the exact fault. We evaluate whether buying replacement parts is economically viable for your specific machine. Finally, we outline the correct installation process to get your unit running safely again.
Verification over guesswork: Humming, clicking, or failure to agitate often point to standard wear components (couplers, capacitors) rather than a dead motor.
Objective testing: Multimeter continuity testing is the only definitive way to confirm washing machine motor failure before purchasing parts.
Cost-to-lifespan ratio: Motor replacement is generally viable if the machine is under 7 years old and the part costs less than 50% of a new unit.
Safety first: High-voltage capacitors retain lethal charges even after the machine is unplugged; specific discharge procedures are non-negotiable.
Many users immediately blame the main power plant when a washer stops spinning. This assumption leads to wasted money and unnecessary frustration. You must separate mere symptoms from root mechanical causes. We often see perfectly healthy motors discarded because a cheap surrounding component actually failed.
Diagnose the problem accurately by observing the specific behavior of your machine. Listen closely during the wash cycle. Watch how the drum responds when the timer advances.
Symptom: Machine fills but won't agitate or spin. Many people assume the drive unit died. In reality, a broken motor coupling, a snapped drive belt, or a faulty lid switch usually causes this issue. The lid switch acts as a safety mechanism. It cuts power to the drive circuit when open. If the switch fails, the machine simply sits there full of water.
Symptom: Motor hums but won't start turning. You hear a low vibrating sound, but no movement occurs. This frequently indicates a blown start capacitor. The capacitor delivers the initial electrical jolt needed to overcome inertia. Without it, the drive unit stalls. Alternatively, a jammed water pump can physically lock the main shaft, creating a similar hum.
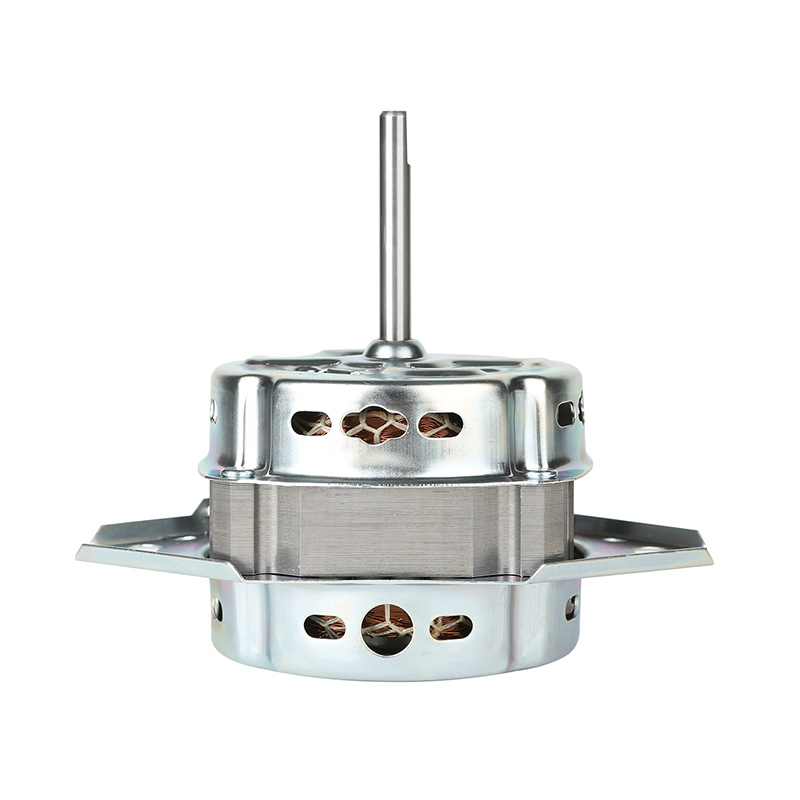
Symptom: Burning smell or visible sparks. These signs usually point to catastrophic electrical or mechanical failure. Seized internal bearings create immense friction, causing a burning rubber or metal scent. Shorted internal windings often produce visible electrical arcing. Both scenarios dictate a full washing machine motor replacement.
Misdiagnosis carries a steep financial penalty. Buying a $150 replacement assembly wastes capital when a $15 capacitor would solve the problem. You might spend hours dismantling the machine, install the expensive new part, and face the exact same failure. Always verify the surrounding mechanical environment before condemning the main drive unit.
Objective testing removes guesswork from appliance repair. You need concrete data to make a smart replacement decision. Testing requires specific tools and strict adherence to safety protocols.
Always prioritize personal safety. Unplug the appliance completely from the wall outlet. Never rely solely on turning the control dial to the "off" position. Next, you must safely discharge the motor run or start capacitor. High-voltage capacitors retain lethal electrical charges long after you remove external power. Use an insulated screwdriver to bridge the capacitor terminals. Wear insulated safety gloves during this procedure.
Begin your diagnostic routine through visual and manual inspection. Check the main wiring harness carefully. Look for burned connection pins, melted plastic, or green corrosion. Poor connections block voltage, mimicking a dead drive unit. Next, manually rotate the drive shaft. It should move smoothly under your hand. You will feel slight, consistent resistance. If you hear grinding noises or feel rigid sticking points, the internal bearings have likely seized.
Multimeter testing provides definitive proof of internal winding health. Follow these evidence-oriented steps:
Disconnect the wiring harness from the main drive terminals.
Set your digital or analog multimeter to the Rx1 (resistance/ohms) setting.
Touch one probe to the common terminal on the motor.
Touch the other probe to the start terminal, then move it to the run terminal.
Evaluate your readings against the manufacturer specifications. Standard diagnostic criteria generally follow the matrix below:
Multimeter Reading | Diagnostic Meaning | Required Action |
|---|---|---|
Zero Ohms (0 Ω) | Internal windings are shorted together. | Replace the motor assembly. |
Infinity or "OL" (Open Loop) | A wire broke inside the internal coil (Open Circuit). | Replace the motor assembly. |
Between 1 and 10 Ohms | Normal resistance for most standard residential units. | Focus testing on the capacitor, timer, or control board. |
Consult your specific service manual for exact OEM specifications. Some modern inverter models have different baseline resistance values. However, readings of zero or infinity universally indicate terminal failure.
Appliance repair decisions require a logical evaluation framework. You must decide whether replacing individual parts makes sense compared to buying a completely new machine. Gathering continuity data is only the first step. You then need to analyze the broader condition of your laundry equipment.
When your multimeter tests show healthy 1-to-10 ohm readings, shift your focus elsewhere. The main drive unit is fine. You should evaluate the motor control board, especially if you own a direct-drive inverter model. Test the timer assembly for burnt contacts. Inspect the drive block and clutch assembly for mechanical wear. Replacing these smaller components saves significant money.
You should replace the main assembly only under specific conditions. Confirmed open or shorted windings dictate a swap. Seized bearings also necessitate replacement. However, you must inspect the rest of the unit first. Ensure the machine remains free of major tub leaks. Verify the main transmission changes gears smoothly. Installing a brand-new drive unit onto a failing transmission wastes your repair budget.
Sourcing parts brings up the classic OEM versus Aftermarket debate. Consider the following comparison before purchasing:
OEM (Original Equipment Manufacturer): These parts guarantee exact compatibility. They match specific torque requirements and retain appliance warranties. The upfront cost is higher, but they offer long-term reliability.
Aftermarket: These generic parts offer a lower initial purchase price. They appeal to budget-conscious DIYers. However, aftermarket units carry higher risks of premature failure. You may also encounter frustrating mounting bracket misalignments during installation.
Sometimes, repairing the appliance makes poor financial sense. Apply the industry standard "50/50 Rule" when evaluating major overhauls. If your machine is over 8 years old, and the combined cost of the part plus professional labor exceeds 50% of a new machine's retail price, replacement becomes the superior capital decision. Modern washers undergo heavy daily stress. An aging machine will likely experience secondary failures shortly after a major repair.
Replacing a standard direct-drive unit requires patience and methodical execution. Rushing the process often causes secondary damage to the transmission or water pump. Gather your tools before opening the cabinet.
You will need a basic toolkit. Keep a 1/4-inch nut driver and a 5/16-inch nut driver handy. Bring a flathead screwdriver for prying retaining clips. Have a pair of slip-joint pliers ready. Always wear durable safety gloves to protect your hands from sharp sheet metal edges inside the cabinet.
Accessing the component involves dismantling the outer shell. For a standard direct-drive top loading washing machine motor, you typically remove the control console first. Unplug the lid switch harness. Use your flathead screwdriver to pop the large brass retaining clips holding the cabinet to the back panel. Tilt the cabinet forward and slide it completely off the frame. You now have full visual access to the mechanical base.
The removal protocol requires careful handling of heavy components. Follow these structural steps:
Unclip the water pump from the main drive shaft. You usually do not need to disconnect the actual water hoses. Just fold the pump safely out of the way.
Disconnect the primary wiring harness. Pull the plastic plug straight back to avoid bending the terminal pins.
Locate the top and bottom motor mounting clips. Sometimes models use retaining bolts instead. Use your nut driver or flathead screwdriver to release these fasteners.
Support the weight of the unit before releasing the final clip.
Dropping the heavy assembly presents a major implementation risk. A falling unit can easily crush the delicate clutch assembly or snap the plastic motor coupling beneath it. Keep one hand firmly underneath the metal housing while removing the last retainer.
Installation requires precise alignment. Position the new unit onto the mounting bracket. If your machine uses a plastic coupling, ensure the prongs align perfectly with the rubber isolator. If your machine uses a belt, route the new drive belt around the pulleys and adjust it to optimal tension. Secure the retaining clips or bolts tightly. Finally, plug the wiring harness back into the terminal block. Ensure the plastic connector clicks firmly into the locking tabs. Loose connections will eventually vibrate free during high-speed spin cycles.
DIY appliance repair carries inherent execution risks. Knowing what goes wrong helps you avoid frustrating rework. Small oversights during reassembly often cause immediate operational failures or create hidden safety hazards.
Pinching wires ranks among the most common DIY pitfalls. When sliding the large metal cabinet back onto the frame, wires frequently slip between the metal panels. A pinched wire cuts through the plastic insulation. This exposes raw copper to the metal frame, creating a severe grounding hazard. Always tuck the wiring harness securely into its retaining clips before dropping the cabinet into place.
Failing to properly align the main shaft causes rapid mechanical breakdown. If you reinstall the water pump at an awkward angle, it binds against the shaft. If the plastic coupling sits unevenly, it will shatter the moment the drum tries to agitate. Take an extra minute to verify all mechanical connections sit flush and secure.
Never load laundry immediately after finishing a repair. You must test the fix using a controlled diagnostic cycle. Plug the machine back in. Select a small, empty quick-wash cycle. Stand near the appliance and listen closely. You want to hear the water fill, the timer click, and the smooth hum of agitation.
Watch for unusual, violent vibrations during the transition to the high-speed spin function. Excessive shaking indicates improper seating on the mounting bracket or a misaligned drive belt. If the cycle completes smoothly and drains fully, your repair was successful.
Fixing a broken laundry appliance requires logic, proper testing, and strict adherence to safety rules. You must confirm the exact point of failure using a multimeter rather than guessing based on vague symptoms. Evaluate the overall age and condition of your appliance before sinking money into expensive replacement parts. If you decide to proceed, prioritize OEM components to guarantee exact torque specifications and reliable alignment.
Always verify your specific machine model number before ordering parts. Search your model number online to locate the exact guaranteed-fit OEM assembly required for your unit. If navigating multimeter readings or handling heavy electrical components falls outside your personal comfort zone, do not hesitate to step back. Schedule a diagnostic visit with a certified appliance technician to ensure the job gets done safely and correctly.
A: Most lack a manual reset button. They rely on an internal thermal overload protector. If the unit overheats, this switch opens and cuts power. It resets automatically once the metal housing cools down. However, repeated tripping indicates a serious mechanical drag, such as a jammed pump or failing bearings, requiring further investigation.
A: Costs vary widely based on the brand and model. If you perform the repair yourself, OEM replacement parts typically range from $100 to $250. If you hire a professional appliance technician, expect to pay between $300 and $500 total, accounting for diagnostic fees, labor, and markup on the part.
A: Under normal residential load conditions, a quality drive unit typically lasts 10 to 14 years. Consistently overloading the drum, using excessive detergent, or operating the machine off-balance accelerates wear on the bearings and internal windings, significantly reducing this expected lifespan.


