 English
- All
- Product Name
- Product Keyword
- Product Model
- Product Summary
- Product Description
- Multi Field Search
EnglishViews: 0 Author: Site Editor Publish Time: 2026-06-22 Origin: Site


A washing machine that refuses to spin, agitate, or run brings household chores to a sudden halt. When the drum sits idle, users often immediately point to a failing motor. However, replacing parts blindly based on a hunch wastes both time and money. You must isolate the true root cause before you buy expensive replacement components. A definitive diagnosis of the mechanical and electrical health prevents unnecessary spending and frustration. This guide provides a standardized, safety-first framework to evaluate your appliance accurately. You will learn how to use basic diagnostic tools, specifically a digital multimeter, to test for continuity and ground faults. Finally, we will help you objectively evaluate the repair costs to make a smart decision between fixing or replacing your machine.
Rule out secondary failures first: Drive belts, lid switches, and control boards often mimic motor failure symptoms.
Safety is non-negotiable: Unplugging the unit and discharging the motor capacitor are mandatory steps before handling any internal wiring.
Data-driven diagnosis: A digital multimeter is required to test for continuity and ground faults; visual inspections are insufficient for a final verdict.
The replacement threshold: If a washing machine motor fails the continuity test or shows a ground fault, replacement is necessary—rewiring modern appliance motors is rarely cost-effective.
You need a reliable diagnostic baseline before you disassemble your appliance. Many peripheral components mimic catastrophic failure. You must differentiate between a truly dead motor and a simple broken sensor. A systematic approach saves hours of wasted effort.
Acoustic and olfactory clues provide immediate diagnostic data. Listen closely when you start a wash cycle. A loud humming or buzzing sound combined with zero drum movement points to trouble. This sound often indicates a seized internal bearing or a failed start capacitor. The electrical current reaches the windings, but the mechanical parts cannot rotate. Next, rely on your sense of smell. A distinct burning electrical odor during the wash cycle strongly suggests melting wire insulation. This happens when the internal coils overheat.
Pay attention to your home electrical panel. Tripping breakers demand immediate attention. If the appliance immediately trips the circuit breaker upon starting, you likely have a dead short in the winding. A dead short means the electrical current bypasses its normal path. It flows directly into the metal frame. This creates a massive power surge and trips your safety breaker.
Best Practice: Always use a process of elimination. Check the drive belt and lid switch assembly before dismantling the machine. These are cheaper and more common failure points. A snapped belt stops the drum completely. A faulty lid switch cuts power entirely, making the appliance seem completely dead.
Symptom Observed | Likely Component Failure | Recommended Initial Action |
|---|---|---|
Humming noise, no drum movement | Seized bearing or failed start capacitor | Check capacitor visually; attempt manual drum rotation. |
Complete silence, no power | Lid switch, control board, or power cord | Test the outlet and inspect the lid switch continuity. |
Immediate circuit breaker trip | Dead short in motor windings | Isolate the power and prepare for a ground fault test. |
Motor runs, drum remains stationary | Snapped drive belt or broken coupler | Inspect the drive belt beneath the main tub. |
Common Mistake: Many users immediately order a replacement part based purely on a humming noise. They later discover a 15-dollar capacitor caused the entire issue. Always let data, not assumptions, guide your repair process.
Working with large electrical appliances carries inherent dangers. Risk mitigation is your first priority. These machines operate on high voltage. They also sit next to water sources. This combination requires strict adherence to safety protocols. You must understand the implementation realities before you touch a single wire.
Power isolation is a mandatory first step. Never rely solely on the control panel power button. You must physically disconnect the plug from the main wall outlet. Next, turn off the hot and cold water supply lines. Disconnect the water hoses from the back of the unit. Have a bucket ready to catch residual water. Keep your work area completely dry.
You must discharge the start capacitor. The capacitor stores a massive electrical charge to jump-start the rotation. It holds this lethal charge even after you unplug the appliance. Locate the cylindrical capacitor near the main drive assembly. Put on heavy-duty work gloves. Hold an insulated screwdriver by its plastic handle. Touch the metal screwdriver shaft across the two metal terminals of the capacitor simultaneously. You might hear a loud pop or see a spark. This safely neutralizes the stored voltage. Never touch the metal shaft of the screwdriver during this process.
Gather your required diagnostic toolkit before you begin. Having the right equipment streamlines the process and prevents stripped screws. You will need:
A Digital Multimeter (capable of measuring Ohms/resistance accurately).
Nut drivers (typically 1/4" or 5/16" sizes fit most appliance panels).
A flathead and Phillips-head screwdriver.
Heavy-duty work gloves.
A bright LED flashlight or headlamp.
Needle-nose pliers for stubborn wire connectors.
Best Practice: Clear a large, well-lit workspace around the appliance. You will need room to tilt the machine or remove bulky exterior panels safely.
Implementation considerations vary wildly based on your appliance architecture. Manufacturers use different chassis designs. You must locate the component based on your specific machine type. Standardizing your approach prevents broken plastic clips and bent metal panels.
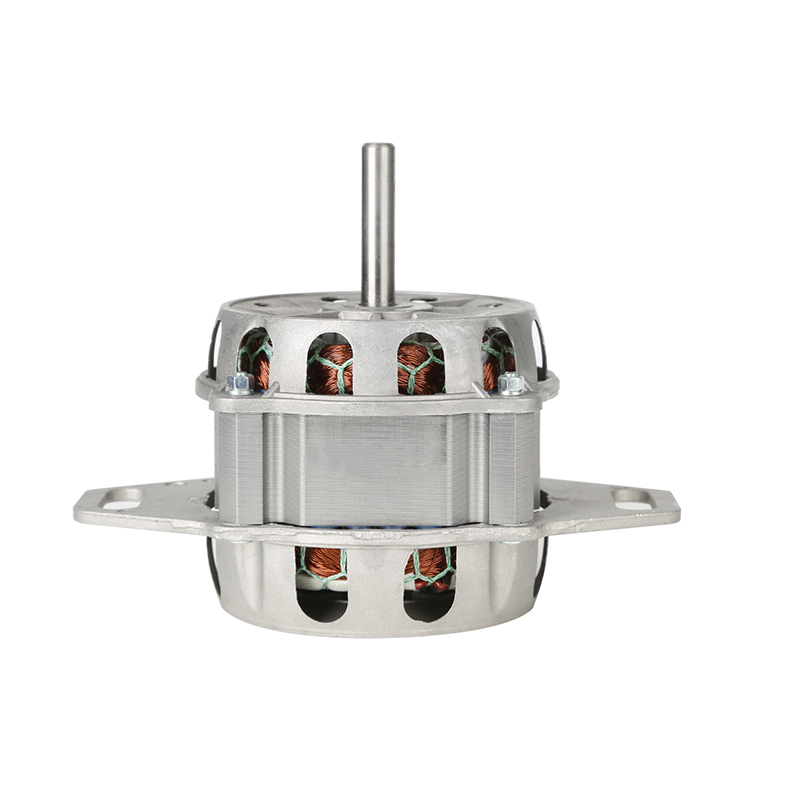
If you own a top-loading model, access is usually straightforward. You typically need to remove the front or rear access panel. Unthread the retaining screws holding the panel in place. Pull the panel away to reveal the internal components. You will find the top loading washing machine motor located near the bottom of the outer tub. It often connects directly to the transmission via a coupler. In other designs, it drives the transmission via a rubber V-belt. Carefully inspect the physical mounting brackets for heavy rust or loose bolts.
Front-loading machines require a slightly different approach. You generally access the internal cavity by removing the large rear panel. Unplug the machine and unthread the perimeter screws. Once you remove the panel, you will see the drive system beneath the drum. Modern direct-drive units feature a large stator and rotor assembly attached directly to the rear of the wash tub. Traditional belt-driven models feature a smaller unit mounted below the drum. This connects to a large pulley wheel via a ribbed belt.
Wiring harness removal demands careful attention. You will see a cluster of wires connecting to the main terminals. Do not just pull these wires blindly. Take out your smartphone. Photograph the wire configuration from multiple angles. Make sure you can clearly see the color coding and terminal positions. This guarantees accurate reassembly later. Squeeze the plastic locking tabs on the wiring harness firmly. Pull the connector straight out. Never pull on the fragile wires themselves, as they can break internally.
You need an exact technical framework to determine component viability. We move from physical observation to hard electrical data. A digital multimeter eliminates guesswork entirely.
Begin with a visual and mechanical inspection. Look closely at the metal terminals. Check for scorched, blackened marks. Inspect the surrounding wire insulation for melted plastic. Grab the metal drive shaft. Try to wiggle it side to side. Excessive play in the shaft indicates shattered internal bearings. If the shaft barely turns or grinds heavily, the mechanical side has failed. Electrical testing becomes secondary if the physical hardware is destroyed.
Set your multimeter for the diagnostic tests. Turn the central dial to the lowest resistance setting. Look for "Rx1" or the Ohms symbol (Ω). Touch the red and black probes together. The screen should read zero. This confirms your meter works correctly. If it reads infinity, check your meter batteries.
Now, perform the continuity test, also known as the winding test. The internal structure consists of long coils of copper wire. These wires must provide a continuous path for electricity. Place your red probe on one main terminal. Place your black probe on the other main terminal. Watch the digital display carefully. We test the main washing machine motor coils to ensure they remain unbroken.
Next, you must test for ground faults. This is a critical safety check. A ground fault means electricity is leaking into the exterior metal frame. Place one probe firmly on the bare metal housing. Make sure you scratch away any paint or rust to get a solid metal connection. Place the other probe on each electrical terminal consecutively.
Multimeter Reading Reference Chart | ||
Test Performed | Expected Reading (Healthy) | Failing Reading (Broken) |
|---|---|---|
Continuity / Winding Test | Zero or very low Ohms (e.g., 2-10 Ω) | Infinity / O.L. (Open Loop) |
Ground Fault Test | Infinity / O.L. (No connection to frame) | Any numerical reading (Current is bleeding) |
Expected outcomes: For the continuity test, a reading of zero or close to zero indicates a continuous flow. The copper windings are healthy. A reading of infinity or "O.L" indicates a broken internal wire. The component has failed. For the ground fault test, the meter must read infinity. Any reading other than infinity indicates the electrical current is bleeding into the frame. The part has failed and poses a highly dangerous electrocution risk.
Common Mistake: Touching the metal tips of the multimeter probes with your fingers during testing. Your body has natural resistance. Touching the probes alters the data and causes false readings. Hold the probes only by the insulated plastic handles.
You now have concrete electrical data. You need a framework for making a financially sound decision based on these diagnostic results. We use shortlisting logic to define your exact next actions.
Scenario A: The unit passes all multimeter tests. It shows strong continuity and zero ground faults. The shaft spins smoothly by hand. In this case, the component is fully functional. Do not replace it. You must redirect your troubleshooting efforts. Check the motor control board for burn marks. Test the mechanical timer mechanism. Evaluate the start capacitor again using a multimeter equipped with a capacitance setting.
Scenario B: It fails the multimeter test. You saw an "O.L" reading during the winding test, or it showed a ground fault. The part must be replaced. Rewiring modern appliance coils is an extremely specialized task. It is rarely cost-effective for residential machines. You must purchase a replacement.
You must perform a strict cost-to-outcome evaluation. An OEM (Original Equipment Manufacturer) replacement typically costs between $100 and $250. You must add the value of your own labor time. Compare this total investment against the depreciated value of your appliance. A heavily rusted, ten-year-old washer holds very little residual value.
We recommend applying The 50% Rule. Look at the total cost of the replacement parts. If that cost exceeds 50% of the price of a brand-new washing machine, reconsider the repair. If your current machine is also over 7 years old, we highly recommend appliance replacement over repair. Older machines will likely suffer cascading failures. The main tub bearings or the transmission could fail next month, wasting your initial investment entirely.
Best Practice: Always search for the exact part number stamped on the metal housing. Do not rely solely on the appliance model number when ordering replacements. Manufacturers often switch component suppliers midway through a production year.
If the math favors repair, ordering the part is your next step. You have already completed the hardest phase. The teardown and diagnostic phases require the most critical thinking. Reinstalling the new part simply reverses the steps you just completed.
Diagnosing appliance failure requires patience, safety protocols, and objective testing. You navigated the diagnostic journey from identifying initial symptoms to executing precise electrical testing. You learned how a humming noise or tripping breaker hints at internal damage, and how to verify those hints using a digital multimeter.
Remember, replacing a failed unit is a straightforward DIY task once the diagnosis is confirmed with hard data. You eliminated guesswork and protected yourself from electrical hazards. Use the data you gathered to evaluate the repair costs logically against the age of your machine.
Your next step is clear. Promptly document your machine's exact model number and the part number stamped on the metal housing. Keep this information handy to ensure you order the correct OEM replacement part. Keep your multimeter in your toolkit; it remains your most valuable asset for future household repairs.
A: No. While you can visually inspect for burn marks or listen for humming, only a multimeter can definitively confirm internal winding continuity or ground faults.
A: Consistent overloading of the drum, power surges, water leaks dripping onto the motor housing, and age-related wear on the internal brushes or bearings.
A: Generally, no. Finding compatible parts becomes difficult, and other major components (like the transmission or main bearings) are likely nearing the end of their operational lifespan.


