 English
- All
- Product Name
- Product Keyword
- Product Model
- Product Summary
- Product Description
- Multi Field Search
EnglishViews: 0 Author: Site Editor Publish Time: 2026-06-14 Origin: Site


Does your washing machine agitate perfectly but refuse to spin your clothes dry? A burning smell or a loud humming noise during the spin cycle usually points straight to a failed motor. Ignoring these symptoms often leaves you dealing heavily saturated laundry. It also causes compounding mechanical damage to your appliance. We will walk you through a realistic, technically sound process for extracting a dead motor safely. You will learn how to navigate dangerous electrical hazards like capacitors. We also cover handling water-exposed fasteners without damaging the surrounding tub, wiring harness, or suspension systems.
Nobody wants to handle a broken appliance manually. However, tackling this specific DIY repair saves you significant time and hundreds of dollars. Before unbolting components, you must understand the serious safety risks involved. Capacitors store lethal electrical charges long after you pull the plug. Furthermore, rusted bolts require specific techniques to remove successfully. We will guide you step-by-step through the entire extraction process. This ensures you can confidently pull the old part, diagnose the root issue, and prepare the chassis for a successful replacement.
Safety First: Mandatory disconnection of power and discharge of the motor run capacitor before tool contact.
Tool Requirements: Requires a multimeter, socket wrench set, screwdrivers, and penetrating oil (for oxidized bolts).
Time Investment: Typically a 1 to 2-hour DIY project depending on machine type (top-load vs. twin-tub) and rust levels.
Decision Pivot: Removing the motor is only half the battle; validating the exact OEM part number before removal prevents prolonged machine downtime.
Ensure you actually need to remove the motor before committing to a messy teardown. Many appliances trick you into diagnosing a massive motor failure when a minor component actually caused the stoppage. You must rule out secondary failures first. Check the lid switch, drive belt, and clutch assembly. A broken belt or faulty lid switch easily mimics a dead motor. They physically cut the power loop or sever the drive connection.
Next, listen closely for the "hum." A seized motor often hums loudly but does not spin. It tries to draw power but cannot physically rotate due to bad bearings. A completely dead motor makes no sound at all. It shows zero electrical continuity on a multimeter. Understanding this auditory difference saves you hours of misdiagnosis.
Finally, you must test the run/start capacitor. Use a reliable digital multimeter set to measure capacitance. A faulty capacitor prevents the motor from generating enough initial torque to start. A simple $15 capacitor replacement often fixes what appears to be a dead $150 Spin Motor. Always test the electrical supply chain before blaming the main drive unit.
Diagnostic Symptom | Most Probable Cause | Immediate Action Required |
|---|---|---|
Loud hum, zero rotation | Seized bearings or bad capacitor | Test capacitor; manually spin drive shaft |
Complete silence, no rotation | Faulty lid switch or severed wire | Test switch continuity; inspect harness |
Motor spins loudly, tub remains still | Broken drive belt or worn clutch | Inspect belt tension; check clutch pads |
You need the right gear to succeed. Emphasizing strict compliance and risk mitigation prevents serious injuries during appliance repair. Appliance motors operate under high voltage and sit near water sources. This creates a uniquely dangerous repair environment for unprepared homeowners.
1/4" and 5/16" nut drivers (or a high-quality metric socket wrench set).
Long-shaft flathead and Phillips screwdrivers.
Needle-nose pliers (essential for releasing stubborn wire harness clips).
A digital multimeter capable of reading Ohms and microfarads.
Thick insulated work gloves.
Capacitors hold a dangerous, sometimes lethal charge long after you unplug the appliance. You must physically discharge the capacitor before touching any internal wires. Put on your insulated gloves. Hold an insulated screwdriver by the plastic handle. Touch the metal screwdriver shaft across the two exposed capacitor terminals simultaneously. You might hear a loud pop or see a small spark. This means the stored energy safely discharged into the tool instead of your body.
Residual water creates a massive mess and a slipping hazard. Drain the tub completely using the lower drain hose or a wet vacuum. Secure the drum securely before tipping the unit. This prevents severe suspension rod damage. Tipping an unbalanced, water-filled machine bends the delicate internal frame. Always lay the appliance on a thick moving blanket to protect your floors and the painted chassis.
We break down the core technical walkthrough below. Follow these steps sequentially to extract the unit without damaging peripheral components.
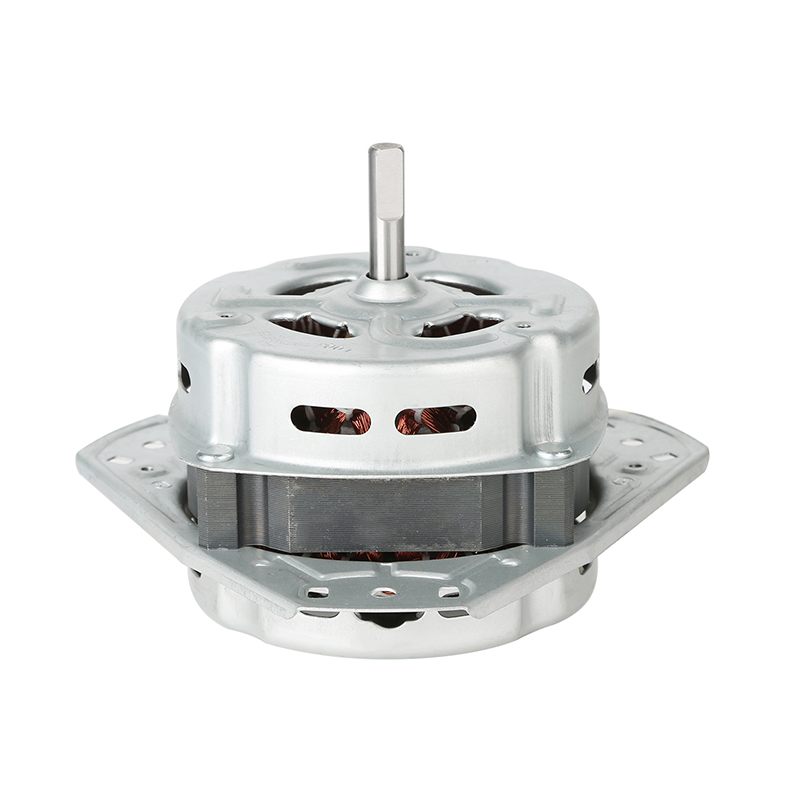
You must open the chassis to begin. Remove the rear or bottom access panel using your nut driver. The exact location varies depending on whether you operate a top-loader or a twin-tub model. Locate the spin motor of washing machine assemblies. They usually mount directly to the heavy steel baseplate or bolt onto the outer plastic tub. Ensure you have adequate lighting pointing directly into the dark cabinet.
Do not force or pry the drive belt aggressively. Carefully slip the drive belt off the main pulley. Rotate the pulley slowly while pushing the rubber belt outward. This rolling motion prevents snapping the brittle rubber. Inspect the belt closely for glazing, fraying, or cracking while it remains accessible. Replace it immediately if you spot deep wear lines.
Electrical connections confuse many DIY mechanics during reassembly. Take a clear smartphone photo of the wire configurations before unplugging anything. Safely unclip the molded plastic connectors next. Press the release tabs gently. Avoid snapping the notoriously brittle plastic tabs. Use your needle-nose pliers for stubborn, heat-fused clips. Never pull directly on the wires. Pull only on the plastic connector housing.
Locate the three or four mounting bolts securing the unit to the base. Unbolt them slowly using your socket wrench. Support the heavy weight of the motor using one hand while removing the final bolt. Dropping it causes severe damage to the delicate brake assembly. It can also crack the surrounding plastic water housing.
Maneuver the heavy unit out of the chassis carefully. Watch your angles closely. Avoid entanglement near the delicate corrugated water pump hoses. Keep your hands clear of the sharp, tensioned suspension springs. Pull it out smoothly. Place it immediately on a sturdy workbench for further inspection.
Washing machines leak frequently over their lifespan. Motor bolts inevitably rust. You must address these real-world DIY roadblocks logically. Manuals rarely explain what to do when things refuse to unbolt.
Apply penetrating oil like WD-40 or PB Blaster directly to the threads of stubborn bolts. Let the chemical oil soak for at least 15 minutes. Attempting to force a rusted bolt usually snaps the head off entirely. Patience saves you from spending hours drilling out broken metal studs. Never use a blowtorch to heat bolts inside an appliance. The surrounding plastic tub will melt instantly.
You might need to transfer the old drive pulley to the new unit. If it feels stuck, use a dedicated mechanical gear puller. Apply gentle, even leverage to pull it off the shaft. Do not strike it heavily with a steel hammer. Heavy blows bend the delicate central drive shaft. A bent shaft ruins the motor permanently.
Retain and meticulously inspect the rubber mounting grommets. These isolate violent rotational vibrations. Reinstalling a washing machine spin motor without these dampeners causes massive shaking. Your machine will literally walk across the laundry room floor during the high-speed spin cycle. Replace the grommets if they feel hard, brittle, or cracked.
Evaluate your next logical step based on cost, machine age, and overall repair complexity. Do not rush into buying random parts online.
Look for the manufacturer sticker on the extracted unit. You must match the exact OEM part number listed there. Generic aftermarket parts often feature incorrect shaft lengths. They might also feature wrong wattage ratings or incompatible mounting brackets. Buying a mismatched part guarantees an installation failure. It also voids return policies once you attempt installation.
We recommend a simple evaluation to decide your next move. Review the following cost-to-value realities before proceeding:
DIY Replacement: Motor costs generally range from $75 to $150. You get a fantastic return on your time investment if your machine is under seven years old.
Pro Repair: Expect to pay $250 to $400 for a technician. This covers their diagnostic fee, labor markup, and the OEM part.
Machine Replacement: Sometimes you face compounding mechanical failures. If the motor, transmission, and main tub bearings fail simultaneously, stop the repair immediately. Investing in a new part becomes a sunk cost. Buy a new appliance instead.
Removing a spin motor requires careful patience, precise tool usage, and strict adherence to electrical safety protocols. You must handle heavy components carefully while navigating tight, dark spaces. Carefully organize all removed hardware into labeled containers to make your reassembly process totally seamless.
Take the following actionable steps to finish your repair journey:
Secure your exact replacement part using only the verified OEM number found on the motor casing.
Verify your appliance warranty status before purchasing components, as the manufacturer might cover the replacement.
Clean the internal mounting area thoroughly to prepare the chassis for a clean, secure installation.
Test your run capacitor again before wiring the new unit to ensure optimal starting torque.
A: Yes. You can perform a multimeter continuity test directly at the wiring harness while it remains installed. However, if you suspect mechanical binding or seized internal bearings, you require a physical, hands-on inspection. You must remove the drive belt to spin the shaft manually.
A: No. Shaft size, mounting bracket points, RPM speeds, and wattage vary drastically by brand and specific model. You must purchase an exact OEM replacement or a certified cross-compatible unit. Universal motors rarely align properly with factory drive belts.
A: Extreme heat points to a failing internal bearing, a consistently overloaded drum, or a bad run capacitor. A weak capacitor forces the motor to draw excessive amperage to maintain speed. This electrical overload generates massive amounts of excess thermal heat.


