 English
- All
- Product Name
- Product Keyword
- Product Model
- Product Summary
- Product Description
- Multi Field Search
EnglishViews: 0 Author: Site Editor Publish Time: 2026-06-15 Origin: Site


Few things are more frustrating than pulling soaking wet clothes from a drum that refuses to spin. This common appliance failure immediately disrupts your daily household routine. Wet clothes pile up quickly. Laundry days come to a complete halt. However, a non-spinning drum does not always mean a completely dead power plant. We created this comprehensive guide to help you accurately diagnose a failing Spin Motor. We will help you rule out cheaper secondary failures, such as snapped drive belts or faulty lid switches. You will learn how to determine whether a DIY repair, a part replacement, or a professional intervention makes the most sense. Appliance repair demands absolute respect for high-voltage electricity and heavy mechanical components. We emphasize strict safety-first protocols throughout this diagnostic process. You will soon understand your realistic DIY limitations while gaining the practical knowledge needed to troubleshoot effectively. Let us walk through the exact steps to get your washer spinning efficiently again.
Verify before replacing: Most "motor failures" are actually faulty lid switches, broken drive belts, or blown capacitors.
Safety is non-negotiable: Unplugging the unit and discharging the run capacitor are mandatory steps before accessing the motor.
Testing over guessing: A standard multimeter is required to test the spin motor for electrical continuity and verify if the windings are burnt out.
The repair vs. replace threshold: If motor windings are fried, the motor must be replaced; DIY coil rewinding is neither safe nor reliable for home repairs.
Before buying an expensive replacement part, you must confirm the root cause. Many homeowners waste money swapping out the motor when a much cheaper component actually failed. You build diagnostic trustworthiness by following a logical process of elimination. Let us break down the comprehensive troubleshooting steps.
Listen for "Humming" vs. Silence: Turn your washer on. Select the spin cycle. Listen very closely. Do you hear a low humming noise, but the drum stays still? This faint hum means voltage reaches the unit, but it cannot rotate. This symptom often points to a physically seized drum or a bad start capacitor. Conversely, total silence usually indicates power delivery issues. The control board might not send voltage at all.
Check the Lid Switch Assembly: Top-load washers use a lid switch as a critical safety mechanism. A broken switch intentionally cuts power to the drive systems. You might think the motor died entirely. In reality, the machine simply thinks the lid remains open. Always test the switch for continuity before digging deeper.
Inspect the Drive Belt and Motor Coupling: Look carefully under or behind the outer tub. Visual inspection remains highly effective here. Ensure the physical connection between the power source and the drum remains intact. Rubber belts stretch and snap over time. Plastic couplings wear out and shatter. If either connection point fails, the motor spins freely, but the drum does not move.
Examine the Run/Start Capacitor: The capacitor stores large amounts of electrical energy. It gives the internal mechanisms a necessary "kick" to start spinning under heavy loads. A swollen, scorched, or leaking capacitor fails to deliver this jolt. Replacing a faulty capacitor restores full function quickly and cheaply.
Working on large household appliances requires proper preparation. You need the right gear to ensure personal safety. You also need basic hand tools for efficient disassembly. Skipping safety steps creates massive risks.
Required Toolkit:
Gather these specific items before you start taking exterior panels off:
A digital multimeter (essential for continuity testing)
A standard socket and nut driver set
Flathead and Phillips screwdrivers
Needle-nose pliers
Heavy-duty insulated work gloves
Power Disconnection:
Never skip this mandatory sequence. You must completely isolate the appliance from local utilities.
Pull the main power plug directly from the wall outlet.
Turn off the hot and cold water supply valves completely.
Disconnect the water inlet hoses from the back of the unit.
Drain any residual water from the hoses into a nearby bucket.
Discharging the Capacitor (Crucial Safety Step):
Unplugging the washer does not make it completely safe. Capacitors store dangerous high voltage long after you cut the power. You must safely release this stored energy. Locate the run capacitor near the base. Wear thick rubber gloves. Hold an insulated screwdriver strictly by the plastic handle. Touch the metal shaft across both capacitor terminals simultaneously. You might hear a small pop or see a brief spark. This action prevents dangerous electrical shocks during your repair.
Once you secure the work area, you can begin the physical extraction. Follow these industry-standard procedures carefully to avoid damaging adjacent components.
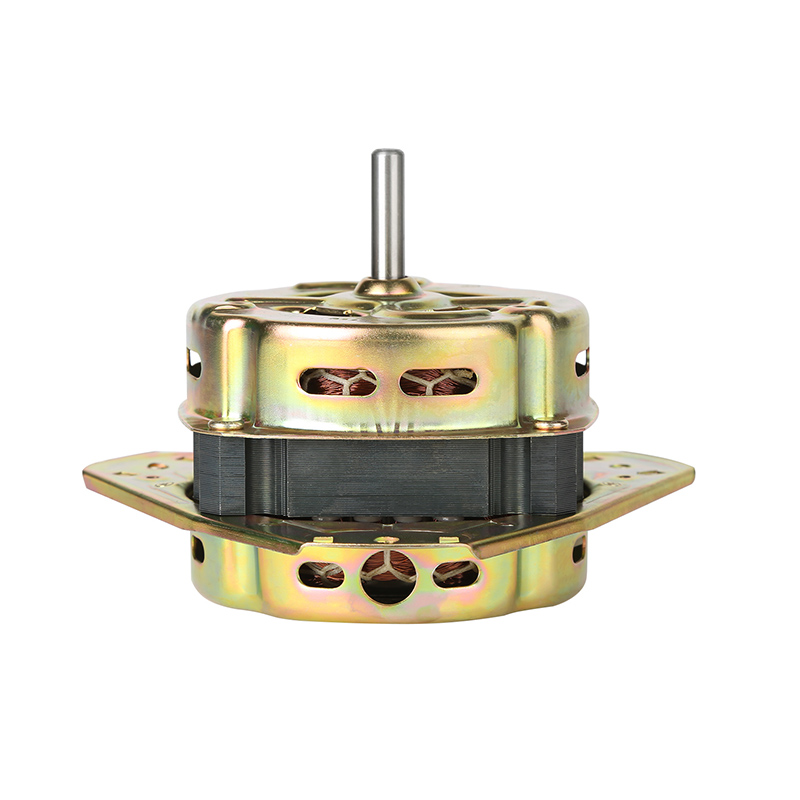
First, you need to reach the internal mechanical bay. For front-load models, remove the rear access panel using your nut driver. Top-load models usually require removing the front panel or tipping the washer backward gently. Secure the unit safely if you tilt it against a wall. Locate the spin motor of washing machine. Manufacturers typically attach it directly to the bottom framework of the outer tub.
Next, isolate the power plant from the drive system. Safely detach the drive belt by slowly slipping it off the pulleys. If your unit uses a direct-drive coupling, unclip the metal retaining rings. Separate the plastic coupling pieces carefully. Locate the wiring harness plug attached to the housing. Press the plastic release tab firmly and pull it straight out. Never pull on the individual wires themselves. Take a quick photo of the wiring layout before disconnecting it. This visual reference makes reassembly infinitely easier.
Now you must verify overall electrical health. Set your digital multimeter to the Ohms (Ω) or continuity setting. Touch the test probes directly to the metal terminals.
A healthy reading shows minor electrical resistance. This reading typically lands between 1 and 10 ohms. It indicates intact internal copper wiring. Conversely, an "Open Line" (OL) reading indicates a broken circuit. If you see OL on the screen, the internal wires are burnt out. The component cannot be salvaged.
If the part fails the continuity test, you must remove it. Use your socket set to loosen the main mounting bolts. Watch out for rusted bolts. Apply a little penetrating oil if bolts resist initial turning. These parts are surprisingly heavy. Support the casing securely with one hand while removing the final bolt. Carefully lower it out of the metal mounting bracket.
After extracting the part, you face a critical financial decision. You must choose the most sensible path forward based on empirical testing.
When to "Repair" (Fixing Peripheral Issues):
Sometimes the unit tests perfectly fine electrically. A physical jam might cause the entire issue. If debris locks the central shaft, clearing the blockage restores function. Older brush-type models often fail due to worn carbon brushes. Replacing these small, cheap brushes is a highly effective fix. It saves you from buying a whole new assembly.
When to Replace the Motor:
A failed multimeter test means the core component is dead. Burnt windings cannot be repaired safely in a home garage. Shot bearings also demand a full replacement. If you hear loud grinding noises and feel excessive play in the main shaft, the internal bearings have collapsed entirely.
Sourcing the Right Part:
You need the exact matching replacement part. Locate the washer's specific model number on the door frame or upper back panel. Use this specific number to find an Original Equipment Manufacturer (OEM) washing machine spin motor. Aftermarket alternatives might cost slightly less upfront. However, OEM parts guarantee correct bolt fitment and proper electrical compatibility.
The ROI of Motor Replacement:
Applying the standard "50% Rule" helps clarify your options quickly. Compare the replacement part cost to the retail price of a brand-new washer. If the new part costs more than 50% of a new machine, you should pause. Furthermore, if your current unit is over eight years old, upgrading the entire appliance usually becomes the smarter financial choice. Older washing machines will likely experience other major component failures soon.
Component Condition | Recommended Action | Estimated Cost Impact |
|---|---|---|
Jammed shaft / Worn carbon brushes | Repair / Clear blockages | Low ($0 - $30) |
Burnt electrical windings / Shot bearings | Replace entire assembly | Moderate ($100 - $300) |
Dead assembly + Unit > 8 years old | Upgrade appliance completely | High ($500+) |
Some repairs push far beyond reasonable DIY limits. You must mitigate personal risk and evaluate the value of your free time.
Complex Inverter Motors:
Modern high-end appliances often feature direct-drive and complex inverter technologies. These advanced systems operate very differently than traditional brushed designs. They frequently require proprietary diagnostic software to recalibrate the main control board after physical installation. Without this professional software, the new part might refuse to run properly.
Warranty Considerations:
Check your purchase paperwork before turning a single screw. Manufacturers strictly govern all warranty terms. Performing DIY repairs on units still under an active manufacturer warranty will instantly void your contract. Always utilize warranty coverage for professional service when it remains available to you.
Time vs. Value:
Be incredibly honest about your mechanical comfort level. Tearing down a modern washing machine easily takes two to four hours for a complete novice. You must also factor in the time spent diagnosing the fault, ordering parts online, and reassembling the casing. Professional repair services offer guaranteed work. They save you significant time and eliminate the severe stress of trial and error.
Evaluation Chart: DIY Repair vs. Professional Service | ||
Evaluation Factor | DIY Repair Approach | Professional Service Approach |
|---|---|---|
Labor Expense | Free (Your own sweat equity) | $150 - $250 (Plus parts) |
Time Investment | 2 to 4 hours (Excluding part shipping) | 1 hour (Plus scheduling wait time) |
Warranty Risk | Voids existing manufacturer warranty | Preserves active service warranties |
Diagnostic Accuracy | Relies heavily on basic multimeter skills | Utilizes proprietary diagnostic software |
Let us summarize the critical evaluation path. You should always check peripheral parts like lid switches, belts, and capacitors first. Use a reliable digital multimeter to safely test the internal electrical continuity. Finally, calculate the replacement return on investment before buying expensive OEM parts.
Remember, a truly dead component represents a strict replacement scenario. Do not attempt component-level DIY rewinding fixes at home. They remain unsafe and highly unreliable for household usage.
Your practical next step is simple. Note your washer's specific model number today. Decide whether you will order replacement parts online or schedule a certified appliance technician. Taking immediate, informed action brings you one step closer to clean, dry laundry.
A: Part costs typically range from $100 to $300, depending heavily on the brand and technology type. OEM parts sit at the higher end of this spectrum. If you hire a professional appliance technician, expect to pay an additional $150 to $250 for baseline labor. This brings the total estimated professional replacement cost to between $250 and $550.
A: Sometimes peripheral components attached to the main assembly can be fixed. You can cheaply swap out worn carbon brushes or blown start capacitors. However, if the multimeter reveals burnt internal copper windings, the core unit is permanently damaged. You must fully replace the entire assembly in this exact scenario.
A: Consistent overloading of the washer drum is the most common culprit. Overloading forces the equipment to work far beyond its intended capacity. Power surges from the local electrical grid also degrade internal wiring over time. Additionally, internal water leaks dripping directly onto the metal housing will cause immediate electrical shorts and permanent structural burnout.


