 English
- All
- Product Name
- Product Keyword
- Product Model
- Product Summary
- Product Description
- Multi Field Search
EnglishViews: 0 Author: Site Editor Publish Time: 2026-06-16 Origin: Site


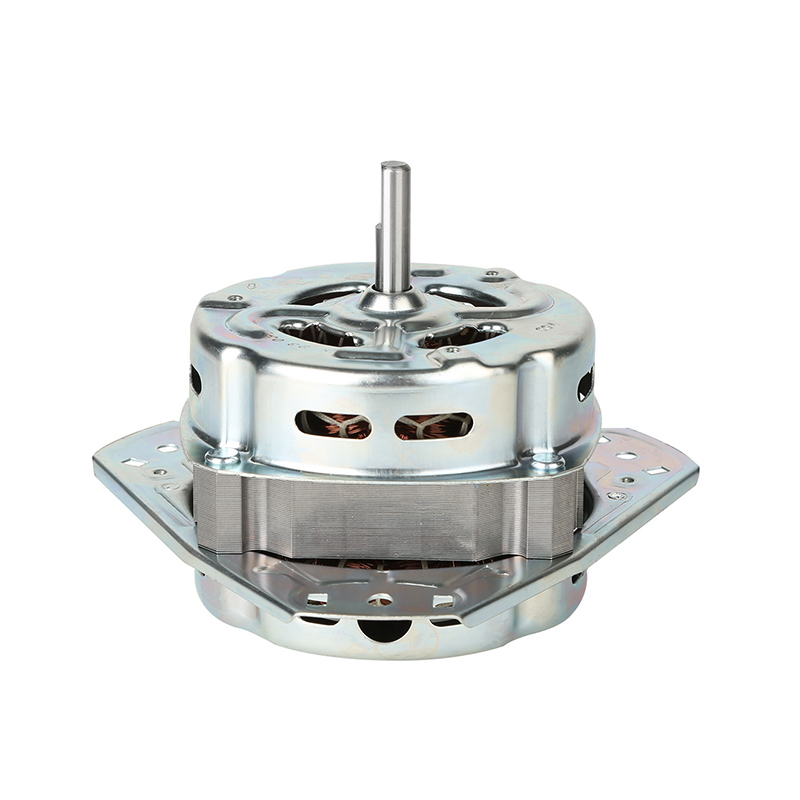
A washing machine refusing to spin stalls daily household routines instantly. Piles of soaking wet laundry force an urgent repair decision. Homeowners often jump to conclusions immediately. They assume the main motor is dead. We know this mistake leads to wasted money on unneeded parts. Our objective here is clear and actionable. We provide a definitive, safety-first diagnostic process. You will learn how to accurately determine if your motor has fundamentally failed. We guide you through ruling out cheaper culprits first. Then, we walk you through a step-by-step multimeter test. You will understand precisely how to measure electrical continuity safely. We also explain how to interpret visual and audio clues during operation. By the end, you will confidently know whether you need a new motor or just a minor replacement. Stop guessing and start testing accurately. Let us secure your peace of mind and protect your household budget efficiently.
Safety is non-negotiable: Disconnecting power and discharging the motor capacitor are mandatory first steps.
Rule out peripheral failures: Many suspected motor failures are actually caused by broken lid switches, worn belts, or blown capacitors.
Multimeter verification is required: Visual inspection is insufficient; a multimeter test for continuity and resistance is the only verifiable way to confirm a dead motor.
Cost-benefit threshold: If the motor has failed, weigh the cost of a replacement washing machine spin motor against the remaining lifespan of the appliance.
We must prevent unnecessary appliance teardowns. You can save hours by eliminating cheaper components first. Many easy-to-fix parts mimic a dead motor entirely. We call these issues peripheral failures. Replacing a healthy motor wastes your time and money. You must check these common culprits before assuming the worst.
Verify the lid switch assembly first. The lid switch is a critical safety mechanism. It intentionally cuts power to the spin cycle. This protects users from reaching into a spinning drum. A faulty switch stops the cycle entirely. The motor will not receive any voltage. Check the switch for physical damage. Listen for a distinct click when you close the lid. If you hear no click, the switch likely failed. Replacing a switch is fast and inexpensive.
Inspect the drive belt and coupler next. You might hear the motor humming loudly. However, the drum refuses to move at all. This specific symptom often points away from electrical failure. It indicates a snapped drive belt instead. Direct-drive washers use a motor coupler instead of a belt. A broken coupler disconnects the motor from the transmission. The motor spins freely, but the tub stays completely still. Always inspect these rubber and plastic parts carefully.
Test the motor capacitor finally. The capacitor provides a massive electrical energy boost. Motors need this sudden boost to start turning. A bulging capacitor is a clear visual sign of failure. A dead start capacitor prevents a perfectly healthy motor from running. The motor will hum loudly and eventually overheat. We provide a summary chart below to help you map symptoms to components quickly.
Suspected Component | Observable Symptom | Action Required |
|---|---|---|
Lid Switch | Total silence, no drum movement, cycle stops | Test switch for continuity using a multimeter |
Drive Belt / Coupler | Motor hums normally, but tub does not spin | Visually inspect for snapped rubber or broken plastic |
Motor Capacitor | Loud humming, motor gets hot, fails to rotate | Discharge and test capacitor capacitance |
Having the right tools ensures absolute safety. It also guarantees highly accurate test results. Do not attempt this diagnostic work empty-handed. You need specific equipment to isolate the spin motor of washing machine safely.
Digital or Analog Multimeter: This is your core evaluation tool. It must be capable of measuring Ohms (resistance). We recommend digital models for precise numerical readouts. They reduce reading errors significantly.
Insulated Screwdrivers & Nut Drivers: You require these for accessing the appliance cabinet. You also need them to discharge capacitors safely. Insulated handles protect your hands from stray voltage effectively.
Work Gloves and Safety Glasses: We strongly reinforce practical safety compliance. Sharp metal cabinet edges cause deep cuts easily. Safety glasses protect your eyes from hidden dust and debris.
Appliance Wiring Diagram: You usually find this schematic inside the control panel. It is absolutely necessary for your diagnostics. It helps identify the specific terminal inputs for the start and run windings.
We follow strict safety protocols here without exception. Unplug the washing machine from the wall outlet immediately. Never rely solely on the front control panel power button. Locate the motor capacitor inside the lower cabinet. It looks like a small black or silver cylinder. Capacitors store lethal amounts of electrical voltage. They retain this heavy charge long after unplugging the machine. Bridge the two capacitor terminals using an insulated screwdriver. This safely discharges the stored voltage. You might hear a loud pop. This sound indicates a successful and safe discharge.
You must physically isolate the motor for accurate testing. Front-load and top-load units require different access methods entirely. Top-loaders usually require removing the front or rear cabinet panel. Front-loaders often need lower access panel removal. Disconnect the main wiring harness very carefully. Do not yank the colored wires directly. Pull the plastic connector block itself. This prevents damage to the delicate metal terminal pins. Remove the mounting bolts securing the motor to the tub framework.
Set your digital multimeter to the lowest Ohms setting. This is usually marked as Rx1 or 200 Ohms. A ground test checks for dangerous electrical leaks. Touch one probe to the bare metal motor housing. You might need to scratch off a tiny bit of paint. Touch the other probe to each individual wiring terminal sequentially.
Evaluation criteria: You want to see "infinity" on the screen. Some digital meters show "OL" for open line. Any numerical reading means electrical continuity exists. This indicates a severe short to ground. The motor is highly unsafe and poses a shock hazard. You must replace it immediately.
Consult your appliance wiring diagram right now. Identify the specific terminals for the start and run windings. Apply your multimeter probes firmly to these specific terminals. The internal wire coils must carry electricity properly.
Evaluation criteria: A reading of zero means the internal windings are shorted together. A reading of infinity means an open circuit exists. The internal copper wire has literally snapped. Both extreme results mean the windings have failed structurally. Normal readings show low, specific resistance values. Manufacturers typically specify readings between 1 to 10 Ohms. A failed winding means you need a completely new Spin Motor.
Test Type | Target Multimeter Reading | Diagnostic Conclusion |
|---|---|---|
Ground Test | Infinity / OL | Motor is safely grounded. Proceed to next test. |
Ground Test | Numerical Value (e.g., 0.5 Ohms) | Motor is shorted to ground. Replace immediately. |
Winding Test | Specific Low Value (1 - 10 Ohms) | Windings are healthy. Check peripheral parts. |
Winding Test | Zero or Infinity / OL | Windings are broken or shorted. Replace motor. |
Visual and audio diagnostics offer extremely quick clues. They help point you in the correct diagnostic direction. Pay close attention to how the appliance behaves during the cycle.
If the motor is silent and cold: Power is likely not reaching the motor at all. The motor itself might be perfectly fine. This specific symptom points to control board failures. It also indicates broken timers or faulty lid switches.
If the motor hums but gets excessively hot: The motor is receiving power but cannot rotate physically. This indicates a severe internal mechanical bind. It might be a completely seized internal bearing. It also points to a failed start capacitor. The thermal overload protector trips eventually to prevent fires.
If there are visible burn marks or a distinct smell: This provides immediate visual confirmation of catastrophic failure. The internal windings have shorted and burned their protective varnish. The smell resembles melting plastic mixed with sharp ozone. You require no further multimeter testing. A complete replacement is absolutely necessary.
Evaluating component costs requires careful thought. You must compare replacement costs wisely before buying parts. Check the average retail price of an OEM replacement. Factor in expensive shipping costs and potential specialized tools. Compare this total sum to hiring a professional appliance technician. Professional labor costs often exceed the actual part price rapidly.
Assessing the appliance lifespan guides your financial choice. We introduce a simple decision framework here. Use the standard "50% rule" for logical clarity. Does the repair estimate cost more than 50% of a brand-new machine? Is your current washing machine over seven years old? If you answer yes to both questions, replacement makes economic sense. Pouring money into an aging unit leads to diminishing returns.
Sourcing parts correctly prevents installation disasters. Always ensure strict compatibility before checking out. Match your exact washing machine model number perfectly. Avoid buying cheap parts based on generic visual matches alone. A generic washing machine spin motor might not fit your tub brackets properly. Buying OEM parts mitigates adoption risks and prevents frustrating installation headaches.
Let us summarize the core diagnostic logic clearly. First, eliminate easy and cheap peripheral fixes. Next, test the internal electrical windings with a reliable multimeter. Finally, evaluate the financial viability of a full replacement. You now possess the expert knowledge to make an informed choice. Your next step depends directly on your test results. Order the correct OEM part using your model number if economical. Alternatively, begin shortlisting a brand-new appliance today. Do not let a stalled machine disrupt your home indefinitely. Take action immediately and restore your laundry routine confidently.
A: Rewinding a damaged motor is technically possible. However, it is rarely cost-effective for residential appliances. Industrial motors sometimes justify the high labor costs of manual rewinding. For home washing machines, buying a brand-new, factory-sealed replacement part is much cheaper. It also provides a reliable warranty. Always opt for replacement over complex internal repairs.
A: Agitation and spinning require completely different mechanical actions. The motor spins in one direction to agitate clothes. It reverses direction to spin the heavy tub. If agitation works, the motor operates functionally. The lack of spinning usually points to a broken transmission, a worn clutch assembly, or a snapped drive belt.
A: You must use the Ohms or Resistance setting. Look for the Omega symbol on your dial. Set the meter to the lowest range, typically Rx1 or 200 Ohms. This setting accurately checks for basic electrical continuity. It also measures the specific internal winding resistance required for accurate motor diagnostics.


